Sitecore Commerce Server
Sitecore Experience Commerce is a natively integrated, cloud-enabled software platform that enables brands to fully personalize the end-to-end shopping experience—before, during, and after the transaction.
It blends content, commerce, and contextual intelligence in a modern commerce platform built on .NET Core.
Please make sure that you meet the following hosting requirements and downloaded and installed the requisite software.
- Operating system– Windows Server 2019/2016 or Windows 10 Pro(64-bit)
- Redis (Windows): 3.0.504
- .Net Framework – ASP.Net Core runtime 3.1.6 (Recommend to install v3.1.7 it has a security patch)
- Database – Microsoft SQL Server 2017 Express Edition(This should be already installed as a part of XP 10)
- Microsoft Web Deploy 3.6
- Install URL Rewrite using Web Platform Installer
- SOLR 8.4.0 (This should have already been installed as a part of XP 10 install)
- PowerShell 6.0 or later
- Web Platform Transformer (Download NuGet package)
Download following Sitecore Software before XC installation–
- Sitecore Experience Platform 10.0
- Sitecore Experience Accelerator (SXA) 10.0
- Sitecore PowerShell Extensions 6.0 for Sitecore 10.0
Before you begin the installation
- Ensure XP 10 instance is working and indexed. If not indexed rebuild all search indexes

- Check if the SOLR is working and accessible via HTTPS

Step-by-step installation process –
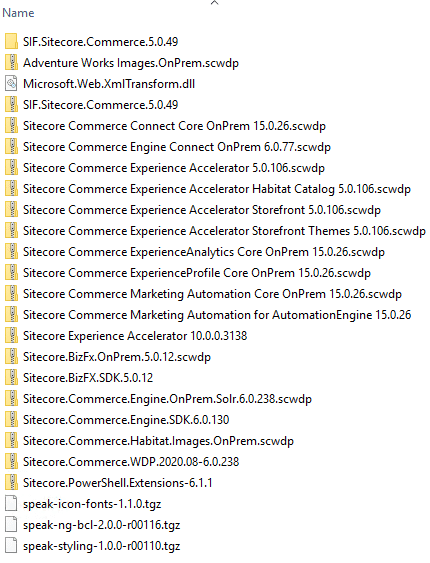
- Create a installation folder for XC – xcinstall e.g. : – c:\scinstall
- Extract and copy Sitecore.Commerce.WDP.2020.08-6.0.238.zip files to the “c:\scinstall folder”
- Sitecore Experience Accelerator – Copy Sitecore Experience Accelerator 10.0.0.3138.zip to “c:\scinstall folder”
- Sitecore PowerShell Extensions – Copy Sitecore.PowerShell.Extensions-6.1.1.zip file to “c:\scinstall” folder
- Microsoft.Web.XmlTransform – Extract Web Platform Transform NuGet package and copy Microsoft.Web.XmlTransform.dll to “c:\scinstall” folder
- Extract SIF.Sitecore.Commerce.5.0.49 to “c:\scinstall” folder
- The folder structure should look like this
- Update Deploy-Sitecore-Commerce.ps1 file
- $SiteNamePrefix
- $SiteName
- $IdentityServerSiteName
- $SiteHostHeaderName
- $XConnectInstallDir
- Update DB related configuration
- $SitecoreDbServer – In case of named instance ensure you set double slash between the server and instance name “SQLServerName\\SQLInstanceName”
- $SitecoreDbServer – In case of named instance ensure you set double slash between the server and instance name “SQLServerName\\SQLInstanceName”
- Update other DB related settings$SqlUser
- $SqlPass
- $CommerceServicesDbServer
- [Optional] Update Sitecore domain or keep it default-$SitecoreDomain
- $SitecoreUsername
- $SitecoreUserPassword
- Update SOLR details-$SolrUrl
- $SolrRoot
- $SolrService
- [Optional] Update local account details$UserDomain
- $UserName
- $UserPassword
- Create Commerce Engine Connect Client Secret for the Sitecore Identity Server
- Copy below script to file to scinstall/SIF.Sitecore.Commerce.5.0.49 folder example XC10SecretClientCertificate.ps1
- Execute the script and copy the secret key
$bytes = New-Object Byte[] 32
$rand = [System.Security.Cryptography.RandomNumberGenerator]::Create()
$rand.GetBytes($bytes)
$rand.Dispose()
$newClientSecret = [System.Convert]::ToBase64String($bytes)

Write-Host $newClientSecret
16. Copy the secret key to update $CommerceEngineConnectClientSecret variable in Deploy-Sitecore-Commerce.ps1

17. Execute Deploy-Sitecore-Commerce.ps1 script to install commerce

18. Once installed successfully log in to Sitecore, you shall find the Business tool in Dashboard

19. Goto content editor and navigate to item- /sitecore/content/Sitecore/Storefront/Settings/Site Grouping/Storefront to change Host Name

20. Visit the site to check if the default storefront site is loading


Comments
Post a Comment