
Sitecore 8.2 upgrade to 10
- Create Sitecore packages from Sitecore 8.2 web applications. Creating the packages separately for Templates, Media, Renderings. Dictionary and Content.
- Installing Vanilla Sitecore 10 instance.
- Take a backup of Master DB and website folder of Sitecore 10 instance.
- Install the Sitecore packages on the new Sitecore instance.
- Take the backup of Visual Studio solution for Sitecore 8.2
- Remove the references (physical files or NuGet packages) of Sitecore.Kernel, Sitecore.Mvc and any other dll used.
- Change the target framework of the Project from 4.6.2 to 4.8 in the properties.
- Add the Sitecore.Kernel, Sitecore.Mvc and any other references using NuGet Packages required for Sitecore 10 version.
- Build the Solution.
- Publish it on the new instance website folder.
A few common changes can be:
- Changes in Core DB.
- Custom config file created but not a part of Visual Studio solution.
- Changes are done directly in the default config files.
- Custom Core created in Search.
- Third-party integrations.
- Any endpoint stored in Sitecore needs to be updated manually.
Diff btw Sitecore 8 vs. 9
- In Sitecore versions 7.5 to 8.2, MongoDB was required for xDB architecture
- In Sitecore 9-SQL Server 2016 and SQL Azure.
- Sitecore 9 external providers can be used to validate credentials using ADFS
- Sitecore.Owin.Authentication.Enabler.config.example
- using Federated Authentication functionality, and Sitecore Identity server.
- Sitecore Commerce was introduced in Sitecore 8.2.
- SXA Is Now Built-In in Sitecore 9-SXA is now included with the Sitecore 9 platform.
- Sitecore9 Forms- previously WFFM forms.
- Version9-we are now given the tools to be GDPR and PII (Personally_identifiable_information)compliant.
- Dynamic placeholders -as part of the product.
- Sitecore9- PowerShell-based installer, previously exe or zip-based.
- version9-Cloud Deployment Enhancements.
- Experience Cloud feature-option of having their entire deployment(s) stored, managed, and secured via the cloud (through Azure PaaS).
- Sitecore 8 was compatible with the .NET Framework, while Sitecore 9 moved towards .NET Core.
- Sitecore 9 introduced Sitecore Horizon, a user-friendly content editing interface that replaced the older Experience Editor.
- xConnect was introduced in Sitecore 9.
- In Sitecore 8, data collection, processing, and tracking were primarily handled by the MongoDB-based Experience Database (xDB).
- xConnect, which is a separate service and API framework for collecting and processing data, was a significant architectural change introduced in Sitecore 9 to replace the xDB.
- Headless CMS: Sitecore 9 supports headless CMS, which means that the content can be decoupled from the presentation layer. This makes it possible to deliver content to different devices and channels, such as mobile apps, wearables, and IoT devices.
| Sitecore version | Supported .NET versions |
|---|---|
| Sitecore 10 | .NET Core 3.1 and later |
| Sitecore 9 | .NET Core 3.1 and later |
| Sitecore 8.2 | .NET Framework 4.6.2 and later |
| Sitecore 8.1 | .NET Framework 4.6 and later |
| Sitecore 8 | .NET Framework 4.5 and later |
- Class must inherit from Sitecore.xConnect.Facet class

Step2: . Register the Custom Facet Model:

step3: Deploy custom Facet model to XDB 
- <x-connect root path>\App_data\Models
- <x-connectroot path>\App_data\jobs\continuous\IndexWorker\App_data\Models
Now deploy your Custom facet class project dll at the following places:
- <Instance_Name>.xconnect\App_data\jobs\continuous\AutomationEngine\
- <Instance_Name>.xconnect\App_data\jobs\continuous\IndexWorker\
- <Instance_Name>.xconnect\bin
- <Instance_Name>.sc\bin

Now your Custom facet is ready for use
Configure Azure Blob Storage
Add config file to your solution

fileUploadStorageProvider type="Feature.FormsExtensions.Business.FileUpload.AzureBlobStorageFileUploadStorageProvider, Feature.FormsExtensions">
- Add the following connection string to the
App_Config\ConnectionStrings.config file of the Sitecore web application. <add name="azureblob" connectionString="DefaultEndpointsProtocol=https;AccountName=myblobtestazure;AccountKey={KEY};EndpointSuffix=core.windows.net"/>Enter the name you have chosen for your container in the blobcontainer part of the configuration.


[HTTPGET]


===========SITECORE PIPELINE VS EVENTS================
preprocessRequest
hasPresentation
httpRequestBegin
renderField
httpRequestProcessed
httpRequestEnd
renderLayout
<httpRequestBegin>
<processor
</httpRequestBegin>
public class NewsArticleLogEntryProcessor : HttpRequestProcessor


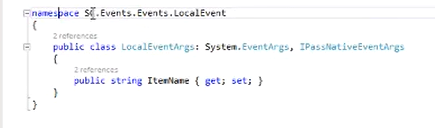
Creating a custom event:


Sitecore Custom Tokens
Already existing tokens :
- $name – Name of the item
- $date – Current server date
- $time – Current server time
- $now – Current server date time
- $id – Item ID
- $parentid – Item’s Parent ID
- $parentname – Item’s Parent Name
Step 1 – Creating a custom ExpandInitialFieldValueProcessor
Create a custom ExpandInitialFieldValueProcessor with the following code.
namespace Sandbox.Processors{ using Sitecore.Pipelines.ExpandInitialFieldValue; public class TokenNextProcessor : ExpandInitialFieldValueProcessor { public override void Process(ExpandInitialFieldValueArgs args) { if (args.SourceField.Value.Contains("$next")) { if (args.TargetItem != null && args.TargetItem.Parent != null && args.TargetItem.Children != null) { args.Result = args.Result.Replace("$next", args.TargetItem.Parent.Children.Count.ToString()); } else { args.Result = args.Result.Replace("$next", "0"); } } } }} |
If the parent is not null and there are children
the value is set to the children`s count (the processor is executed after the child is added so the index will be 1 based),
otherwise, it sets the value to 0.
<?xml version="1.0" encoding="utf-8" ?> <sitecore> <pipelines> <expandInitialFieldValue> <processor type="Sandbox.Processors.TokenNextProcessor , Sandbox" patch:after="processor[@type='type=Sitecore.Pipelines.ExpandInitialFieldValue.ReplaceVariables, Sitecore.Kernel']"/> </expandInitialFieldValue> </pipelines> </sitecore></configuration> |
---------------------------------------------------------------------
==============================================
Create a dynamic URL with a wildcard item

==================================================
Create a new Button on Ribbon:
GoTo Core Database


Creating a custom submit action
Create a submit action class
create a class that inherits from the SubmitActionBase<TParametersData> class.public class LogSubmit : SubmitActionBase<string> {protected override bool Execute(string data, FormSubmitContext formSubmitContext)}Create a submit action item
Go to /sitecore/System/Settings/Forms.

- Go to the item you just created and in the Settings section, in the Model Type field, set the value to the class type name.

Versioning of an item is controlled in three ways:
- Versioned fields
- Unversioned fields and
- Shared fields

Versioned fields:By default all the fields are versioned.The field value will be different across different numbered versions and different language versions as well.Unversioned fields:value is the same for all the numbered versions of a specific language.Shared fields:value doesn’t change across languages and the number versions.
Create a submit action class
SubmitActionBase<TParametersData> class.Create a submit action item
Go to
/sitecore/System/Settings/Forms.- Go to the item you just created and in the Settings section, in the Model Type field, set the value to the class type name.
Versioning of an item is controlled in three ways:
- Versioned fields
- Unversioned fields and
- Shared fields
Create a custom personalization rule
Step 1- First step is to create a new tag for our Custom rule under “/sitecore/system/Settings/Rules/Definitions/Tags”

Step 2: Go to the path “ /sitecore/system/Settings/Rules/Conditional Renderings ”

Step 3- Next- create custom Element and personalization condition under “/sitecore/system/Settings/Rules/Definitions/Elements”


Design patterns:


----------------------------------------------------------------------
Sitecore Helix
- Pattern practice and standard
- loosely coupled components
- downward dependency
- The Foundation layer -contains more abstract code and Interfaces.
- -it supplies elements that are common to multiple features
Build and Deployment process:
First Foundation modules, then Feature modules and then project.

- Project-> layout.cshtml, placeholder, Any website or page-specific CSS JS, inversion of control or pipeline patterns
Feature->navigation, hero banner, accordion, login
Foundation-> helper class, multi-sites, common utility, Sitecore platform, .NET, and other technology frameworks such as Bootstrap, Foundation, jQuery, etc


Configure federated authentication
Configure an identity provider:

FederatedAuthentication.Enabled setting by setting it to true.

etc..

Memory Optimization in DB:
GlassMapper v4

:IGlassBase
·
Glass.Mapper.Sc.{Version}
·
Glass.Mapper.Sc.{Version}.Mvc
·
Glass.Mapper.Sc.{Version}.Core


API authentication


Sitecore Validations


------------------------------------------------
UNICORN serialization

Sitecore Cache

Link manager Sitecore

--------------------SOLR Search---------------------------
Enable a Solr search provider in Sitecore in Web.config:
<setting name="ContentSearch.Provider" value="Solr" /> In Sitecore.ContentSearch.config Solr search index API::

Custom Solr Index:SITECORE INDEX: Creating a custom SOLR index
Types of Templates in Sitecore:
- Data Templates: normal
- Branch Templates:
- Command Templates:
- Standard Templates: define the display name, layout details, publishing restrictions and workflow, etc. on the items


-----------------------------------------------
Performance:
Indexing Strategy:
Image optimization
Caching
GetDescendants
No of Items under one node
Sitecore Admin
Cache page:
Jmeter
Sitecore
Pipeline Profiler:
Event Queue
Statistics:
-----------------------------------------------
MVC Routes

Configure multiple managed websites
<site name="website"…/> definition in the Sitecore.config file.Site 1 =>
rootItem="sitecore/content/site1" startItem="Home" ...Site 2 =>
rootItem="sitecore/content/site2" startItem="Home" ...
virtualFolder physicalFolder 
Multilingual in Sitecore:
-------------------------------------------------------------
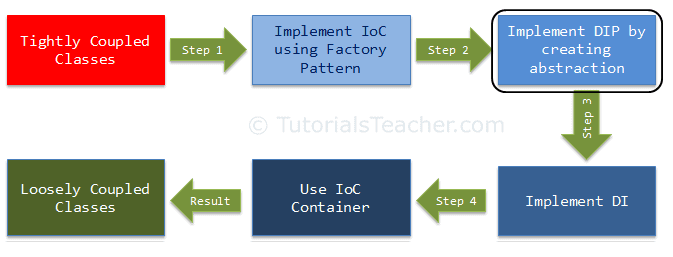
Autofac DI and IOC container
- InstancePerDependency()
- SingleInstance()
- InstancePerLifetimeScope()
- InstancePerRequest()


Modularity feature:


SOLID Principles

O
Liskov Substitution Principle
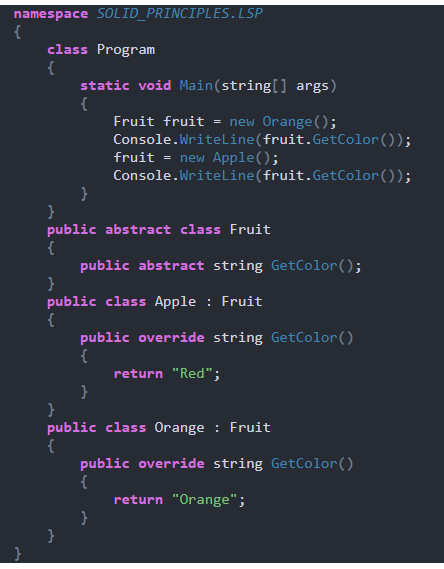

DIP
Abstraction and encapsulation
Singleton vs Static
- Singleton classes follow the OOP (object-oriented principles), static classes do not.
- We can implement an
interfacewith a Singleton class, but a class's static methods (or e.g. a C#static class) cannot.
Comments
Post a Comment